

The Send Claims to Insurance Companies screen permits users to batch process their claims filling. The screen permits users to select which claims they wish to process and either print them or send them electronically (e-claims).

The electronic transfer of claims (e-claims) requires the proper Claim connector to function properly. In the USA the default claim connector is for the standard paper format which can be sent electronically to any processor accepting the paper format. Canadian clients will use the Canadian Claim connector suitable for their province. The Claim Connector will appear in the drop down button called Process Selected Claims. If you do not see the Claim Connector you require Please call your Filopto Sales Representative for more information
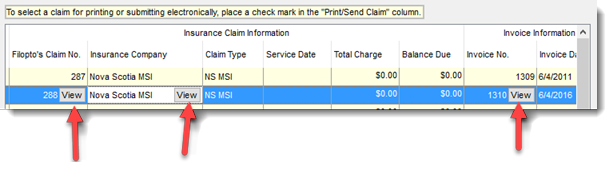
Claim / Invoice / Insurance Detail
To view the detail of a claim, invoice or insurance company select the appropriate view button in the claim grid.
To send your claims.
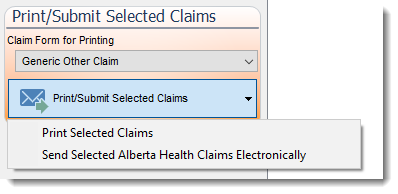
Identify the claims to process by placing a check mark beside each claim to prepare. Select the Claim Form for Printing from the drop down list. Then select the Print/Submit Selected Claims button to process the claims.

The drop-down field Claims to View allows users to display the processed claims or those not yet processed.
Note: The field containing the date on which the Claim form was printed or submitted electronically will show a default date of 30/12/1889. This is the default start date of your computer. If no date exists in the field (not yet printed or submitted), the computer displays this date instead of a blank date. Once you have printed or sent the claim electronically, the date on which it was printed or sent will replace this default computer date.
To print, reprint, transfer or re-transfer claims electronically, you can either use the Select All button or manually enter a check mark in the Print Claim field to print or transfer the selected claims. Once a check mark is present, selecting the Process Selected Claims button will print or transfer the claims.
To edit a claim listed in this screen, you can double click claim number which will open the claim editing screen for the selected item.
Claim Resubmission
To resubmit rejected claims, from the claims manager select the appropriate claim, click on the View Edit button to open the claim. You can then proceed to make the changes required and then change the status to corrected. When you are ready to submit claims ensure that you also view and select the claims with the Corrected status so that they are also submitted.
IMPORTANT: Depending on the Canadian Claim connector you are using, each connector may have their own rules on how to re-submit claims. Review the information provided by your claim authority for the proper way to re-submit claims.
|
