Paper Free Module (Optional Module)
(Patient file, Inventory, Vendor Profile)
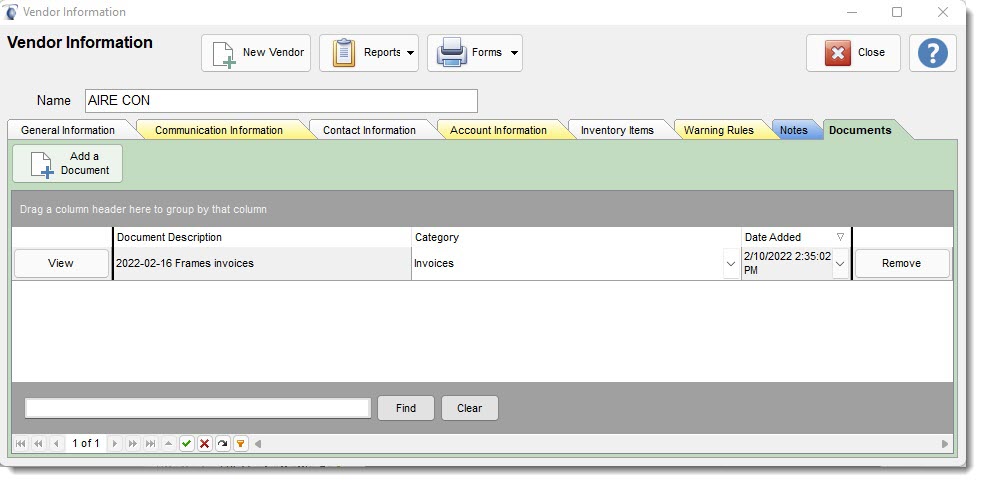
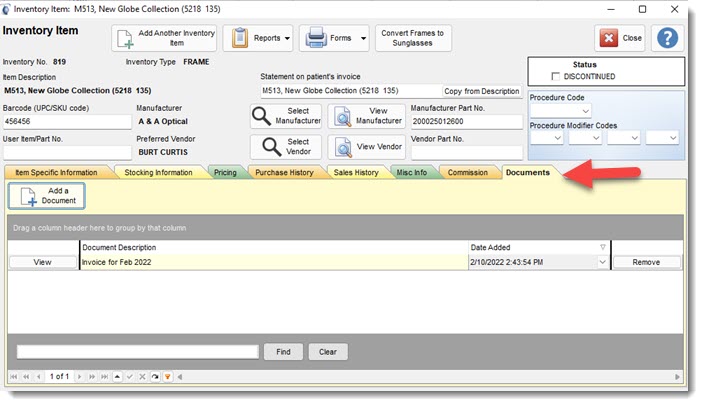
PaperFree is available in the Patient file, Inventory screen and Vendor Profile. All tree locations function in the same basic manner.
Patient File
Located in the patient file under the PaperFree Manager Section, the Paper Free Module is an optional electronic record management system directly linked to the patient file. Inventory and Vendor module. It allows for the electronic notification, recording and scanning of various external documents and multi-media into the Filopto patient record, Inventory and Vendor profile, as an electronic filling system. This reduces the amount of paper required to be kept. It also permits electronic documents such as word processor documents, video, sound, x-rays, Faxes, PDF and other file types to be easily referenced.
There is no limit, other than physical storage space on the server, for the number of documents or files you can store in this module. If you have not acquired this module, you will receive an error message that the module is not installed.
When you enter the Paper Free Module, the following screen is presented.
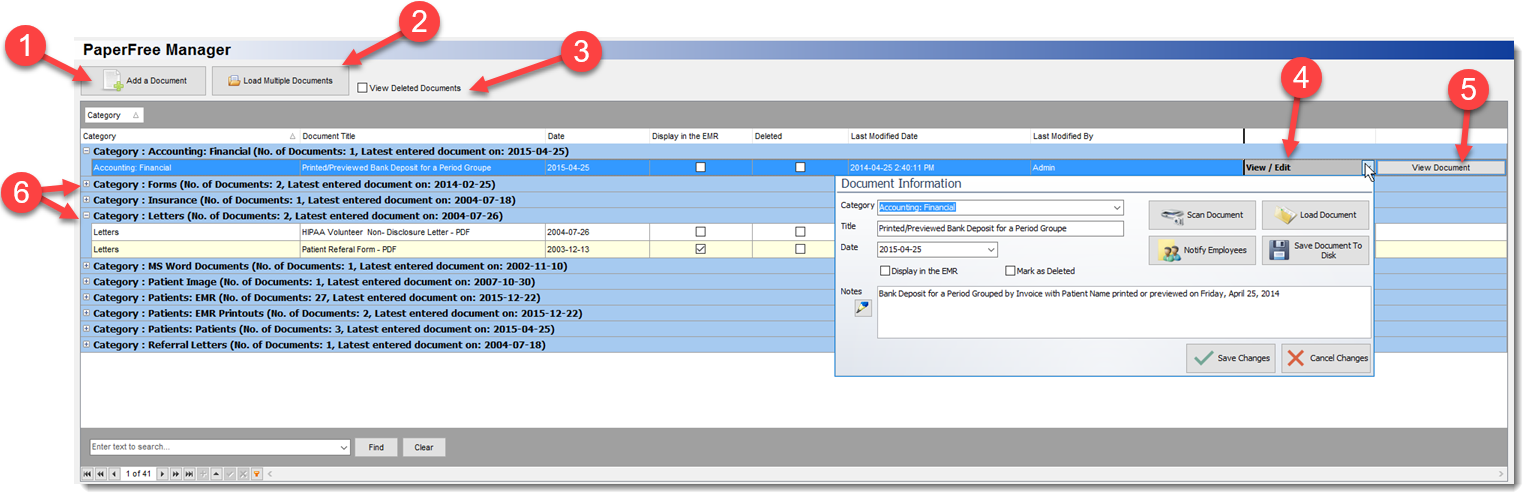
The screen is divided into two major sections:
On the top, are buttons permitting documents to be added one at a time (Add a Document (1)) or the ability to add multiple documents simultaneously (Load Multiple Documents (2)). You also have the ability to show deleted documents (3) linked to this patient.
Below in the data Grid are the Categories under which the documents are filed. The user defined categories are created in the System Settings-Patient section.. Users can create an unlimited number of categories. (see system settings help section for creating categories)
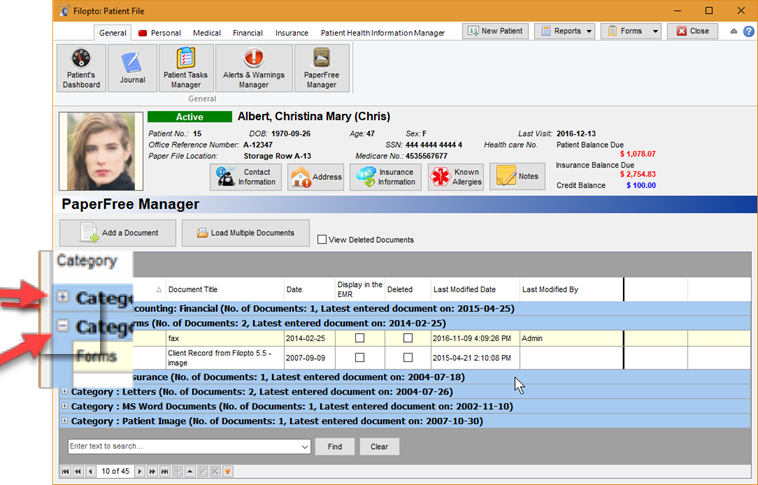
By clicking on the + or - sign (6) beside the document category will expand or minimize the data grid rows and display the documents stored in the selected category.
The View/Edit button (4) permits the user to view and record a description of the stored document, The View Document(5) button will open the selected document.
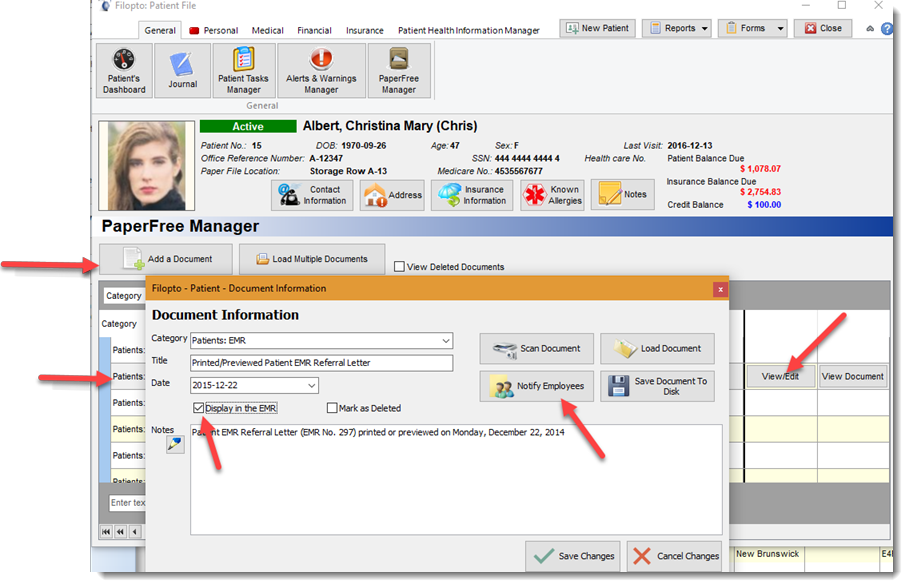
The Document entry screen permits users to DISPLAY in the EMR the attached document by placing a check box in the appropriated field. It also allows for review of a document by a user by using the Notify Employees button which will display the document on the home page of the user in the Document to View section. (see below for more information)
To View a document click on the View Document (5) Button.
IMPORTANT:
You must have a corresponding program able to open the file type of the document saved, installed on your PC to be able to open/view the document. For example, to view a Microsoft Excel file, you need either Excel to be installed or have the Excel file viewer installed on your PC. Windows cannot display/view a file if a corresponding program able to open the file is not available.
|

IMPORTANT:
PaperFree supports any electronic file (multimedia, sound, pictures, documents etc...) therefore being able to store any type of note, file or document in a native format means that when you select to view the document it will open using the program which originally created it or is able to display or play the file. For example: If you store a word processing document, you will need a program on the PC that is trying to view the document that is capable of opening the word processing document. The same is true for a picture, multimedia, sound file or any other item stored. ( see Supported File Format types for more information)
|

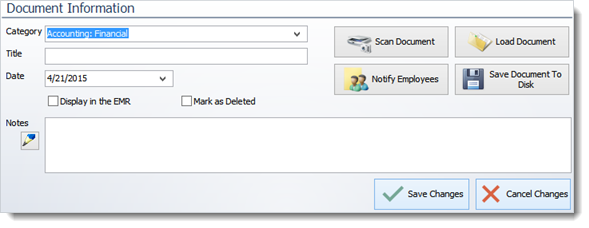
Create / Add New Document
To add a new Document, click on the Add a Document or Load Multiple Documents button located above the grid. This will create a new blank record into which you can enter the document information and load the image or multi-media file. To create a new record, you must enter the Document Category, Title, Document Date and a description of the document in the notes field and finally load the image of the document or file using the Load Document button. The Load Document button allows you to navigate your PC or network to retrieve and load any type of file you wish to store in PaperFree.
 The T.I.M. button permits users to easily enter standard description for a document by using the TIM function.
IMPORTANT:
When specifying the Document Category, the drop-down list is self-created. In other words, by adding a new Category entry in this field, you are creating a new category of documents in the list. We recommend that you group your documents by category to easily locate them later on.
|
Add Multiple Documents at Once
To add Multiple documents to one category, select the Load Multiple Document button locate at the top of the gird. It will prompt for the category to add the files into and then permit the user to select multiple files.
Scanned Images / Documents
To enter a scanned image or file, select the Scan Document button. This action will present the scan screen of your scanner or image device from which you can scan or import an image.
Note: The items displayed in this module are not the items displayed in the Exam drawing module. Both modules are distinct and do not share images between each other. For more information on the Drawing Module, see the Help section called Exam.
|
PaperFree can import any type of scanned image such as a picture, a fax or other scanned paper document. To scan a document you must have a twain compatible device such as a scanner, camera or other such device.
Save Document to Disk
The Save Document to Disk button permits the export of a document saved in PaperFree.
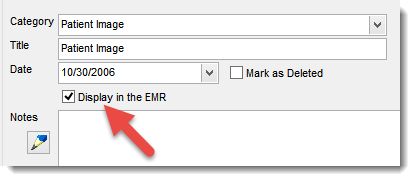
EMR File Access
You can give the EMR access to the PaperFree files by placing a check mark in the field called Display in the EMR. If a file does not have a check mark in this field it is not available to be viewed in the EMR Patient document section.
Notify Employees
 The Notify Employees button will only appear for the creator of the document. It allows the creator of the document to notify employees that a new document has been added to a patient file and needs to be reviewed by them. If the user is not the administrator/creator for the documented, the name of the administrator will be displayed instead of the button.
IMPORTANT:
Only the creator of the document can assign or remove a user from the notify list. This restriction is to insure that notifications are not remove by unauthorized individuals.
|
To select which employee is to be notified click on the button and the notify screen will appear.
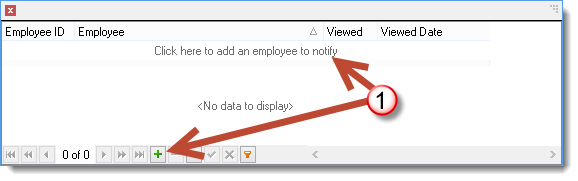
By clicking on the + sign or the first row (1) will create a blank record from which the user can select the Employee ID column drop down button to view the list of employees. From this list you can identify the employee to be notified of the document.
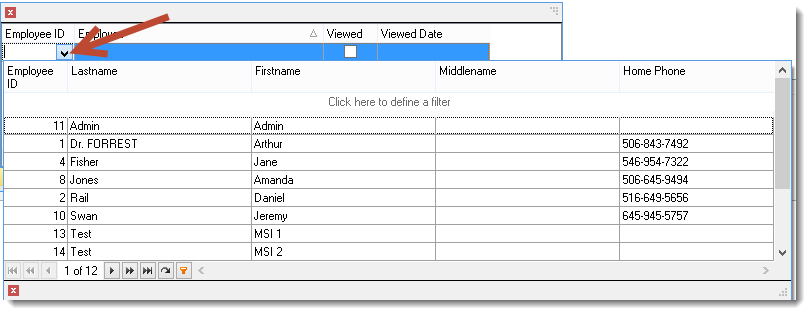
Select the employee to notify, save the record ( check mark icon) and repeat to add additional employees to notify. The employees in the list will receive a notification as well as the document will appear on their home screen. If the person is a provider any document they have not reviewed before doing and exam will be available in the EMR for review.
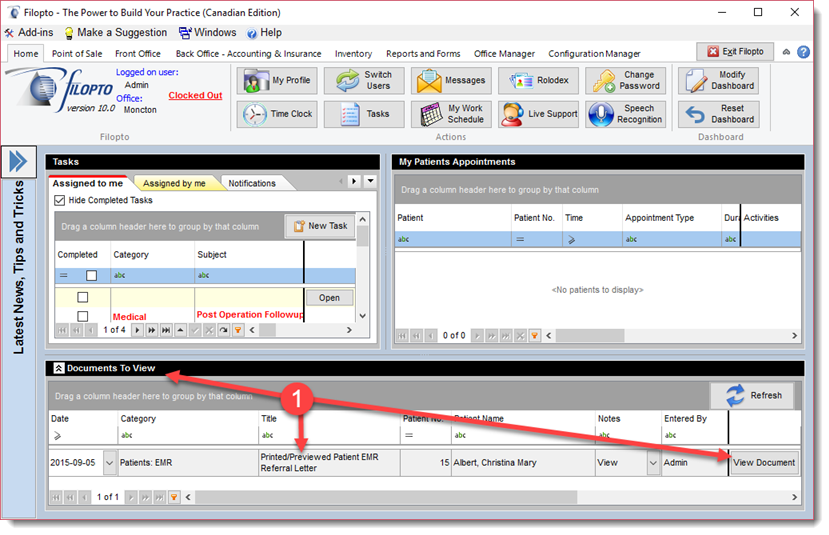
Home Screen for Document
if you have acquired the PaperFree module the Home tab will display all documents that have not yet been reviewed by the sign on user. The user can view the document by selecting the View Document (1) button. Once the document is viewed the system automatically flags it a viewed and removes it from the list. You can refresh the list by selecting the Refresh button.
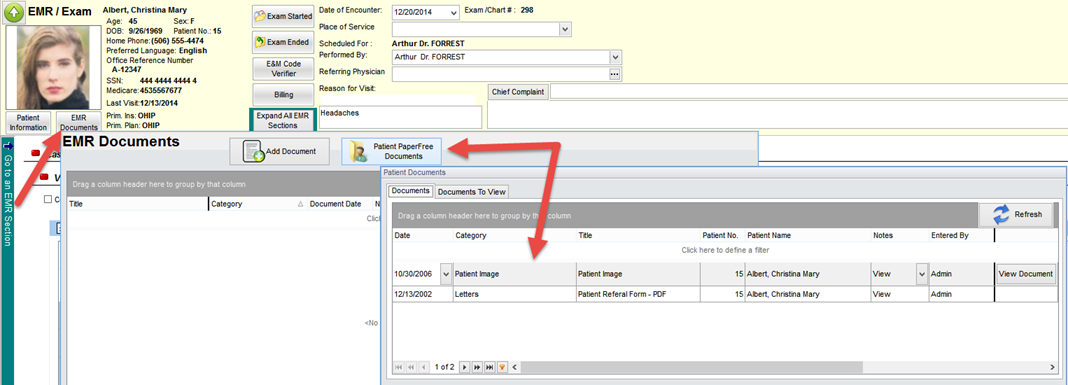
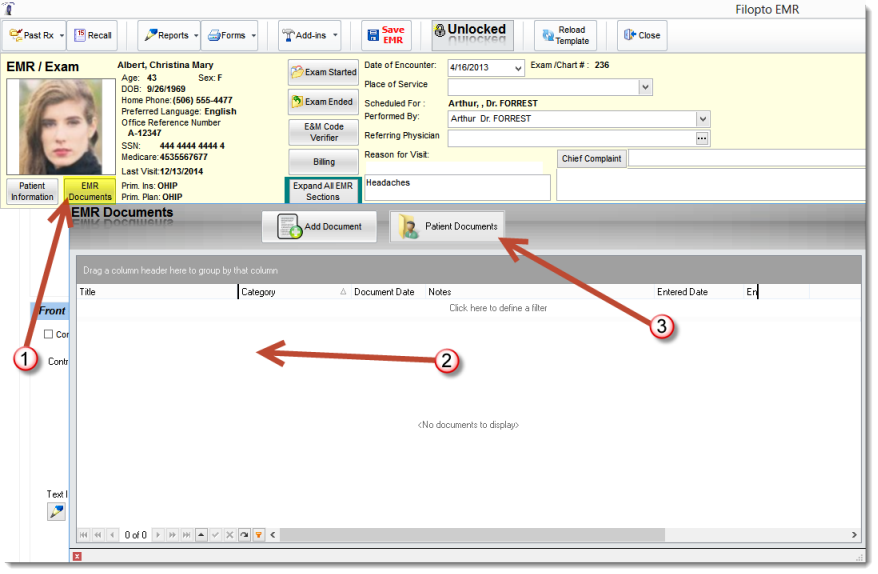
Document in the EMR
Documents identified to be shown in the EMR are automatically displayed as well as documents flagged for the user to be notified are displayed in the EMR if they have not yet been viewed by the user. The user can access them by selecting the EMR Document button (1) and selecting the Patient Document button (3) to see a list of all documents related to the patient. The Documents listed in the EMR document grid (2) are the EMR documents entered during the exam and only related to this exam. (these documents are not accessible outside of this specific exam).
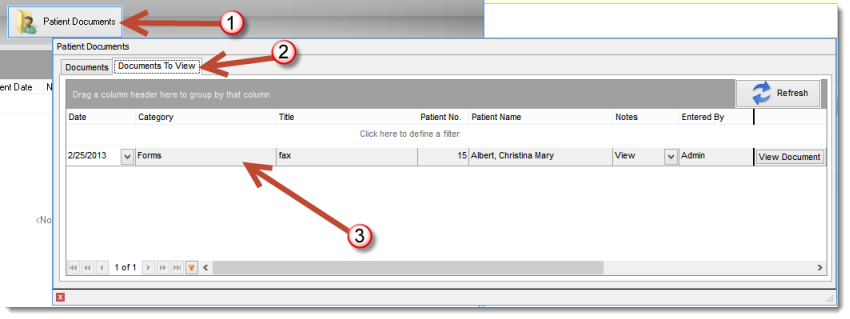
To view the documents not yet viewed for a patient that was entered via the PaperFree module select the Patient Document button and the Document to View tab. If there is a document that has not been viewed it is accessible from this location. Note that you cannot enter a document into PaperFree from the EMR screen. If you need to enter a document from the EMR use the Patient Info button to directly access the PaperFree section in the Patient file.
Delete a Document
To delete (remove from view) a document from the PaperFree module, select the Mark as Deleted check mark. This will place an audit flag on the document and hide it from view.

To view a deleted document place a check mark in the View Deleted Documents check mark box.
Important Image and Document Compression information
If your (hard drive) storage space is at a premium, we recommend that you store your documents and images using a compress format such as PDF and JPEG. The impact between a compressed and uncompressed image or document can be measured in the extra amount of storage space required to store the image or document and the extra time required for your computer to display or print the image or document. By default Filopto stores all images in the JPEG format. We recommend when possible to store documents in PDF format since this format is typically smaller (require less storage space) than some other formats. Word and Excel documents are automatically compressed thus require less space.
|
Vendor Profile and Inventory Screen
Also see the Vendor Profile section and Inventory screen that also permits documents to be saved.