(Note: Only Filopto Administrators have access to the Employee Profile Security Tab)
The Security tab permits the administrator to create the User Security profile for each user/employee, change the user password and set the access rights to various modules, functions and reports.
The system access and security policies are created in the Security Manager section of the Filopto Configuration Manager (tab). Once the base security policies are created in the Security Manager, you may apply the created policies to each user using the security tab in this screen (Employee Manager).

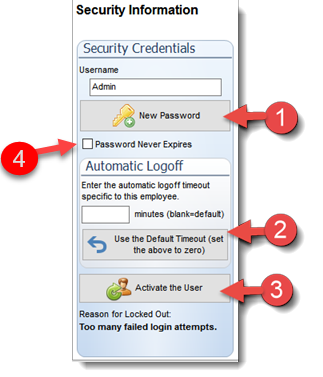
SECURITY CREDENTIALS SECTION:
|
The user security credential section administers the user Logon name to the system and the password for the users. Without these user credentials created a user will not be able to login to Filopto.
Username Password (1): To create the user Logon name and password enter the required information and select the New Password button to create a user password..
The Password Never Expire option should only be used in very unique circumstances and over rides the system defaults. Not changing passwords on a regular basis greatly reduces the system overall security.
Automatic Logoff (2):
Administrators can override for specific users the default log off policy set in the Security Manager. To blank the minutes entered for a user, select the Use the Default Timeout button to reset the value to the corporate policy set in the Security Manager.
Activate the User User in Lock Status Too many Password Attempts User Lock Out unable to Sign In (3) (This button only shows when a security policy is compromised)
In the event that a security policy is activated (too many attempts to login (password not correct), period of inactivity or user status has been placed as non-active) the user account is automatically placed in a lock status. You can re-activate/reset a user password using this function.
(3) The reason for the user account lock is shown below the Activate the User button.
The administrator may clear the employee lock status (if too many Logon attempts or period of inactivity caused the lock) on the employee account by selecting the Activate the User (3) button. The Activate the User button clears all locks caused by the employee account having breached a security policy. If the user account status is non-active the user will not be able to Logon until the status has been changed to active.
Password Never Expires: allows a user to be exempted from the system wide security policy that forces a user to change their password after x number of days. Placing a check mark (4) de-activates the user password from the password security verification rule. (for more information see Security Manager - Global Settings.
|
|
The password entry screen permits users to create their own password based on the security policies defined by the organization.
As you enter your password the screen will evaluate and display the strength of the password entered and place a check mark beside each password policy requirement that has been met.
You require at a minimum 8 character for a password to be valid. Your organization may require more to achieve acceptable security. |
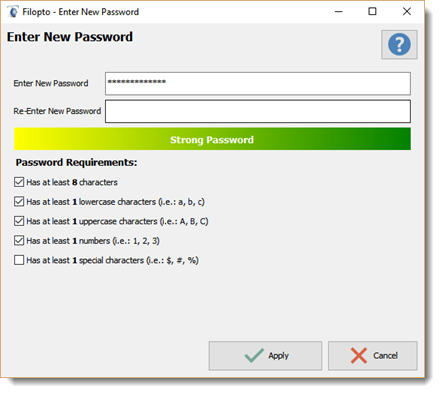
 For help on how to create a strong password select the Help icon.
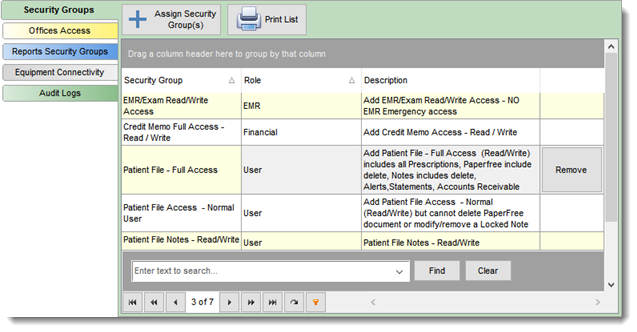
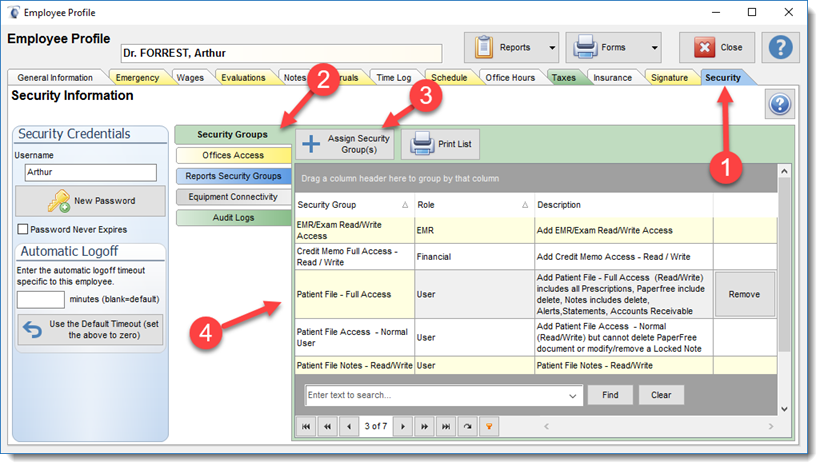
SECURITY GROUPS SECTION:
The security group section permits administrators to assign multiple access policies to a user. By selecting the Assign Security Group button the administrator can review the various access policies available by user roles (created in the Security Manager). The administrator must select the appropriate access policy for the employee.
Security Access policies are grouped by user roles and contains various access rights depending on the role.
Typically, users will have one or more access policies added to their security profile giving them access to the various elements and functions for one or more of a given role.
For example a typical user may have several access policy from the User, Financial and EMR role giving them access to Filopto tabs , Patient file, Scheduler, Invoicing and EMR functions
Remove a security policy from a user by using the Remove button beside the selected policy.
Print the Security Groups for a user by using the Print List button.
See Security Access Rights for more information |
Access Security Groups are created in the Security Manager located in the configuration Tab. Security Groups assigns the access rights to a user. Without security groups assigned to a user the user cannot use Filopto.
Assign User Access Groups to a User
Go to the Employee Account/Profile Security tab (1) and select the Security Groups Tab (2) and assign (3) the user allowed access groups to give the user the access rights needed. A list of access rights given to the user are displayed in the Security Groups grid (4).
|
|
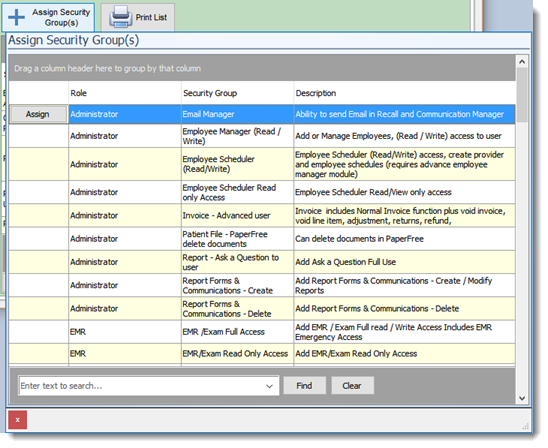
The Assign Security Group button permits administrators to assign a access policy to the user profile.
The list displayed is created in the Configuration Manager tab - Security Manager. The policies are listed by Role. The user can sort, group, find and display the policies as required using the data grid capabilities.
By default users have no access rights. The administrator must assign the appropriate access rights based on the task and functions the employee will be doing. Each role may have various access rights to functions such as
❖no-access, ❖read only ❖read and write
The Read and Write access gives full access to the user to create and make changes.
The administrator can create their own roles, but by default Filopto comes with pre-made policies grouped in the following roles:
|
|
|
User: Basic function applicable to most users such as access to the main Filopto tabs such as Front Office tab, Patient File, Patient Scheduler, Reports and Forms, etc..
Administrator: Functions normally reserved to system administrators of Filopto such as Employee Management, advanced functions in the Invoice and Patient file.
Supervisor: Functions related to office supervisor functions such as Recall Manager.
EMR: Access policies related to the Exam/EMR module. Typically related to providers and their assistant.
Financial: Access policies related to financial transactions such as the ability to change prices, void items etc..
Security: Sensitive functions related to the system overall functioning and security such as the Configuration tab, Security Manager, Backup function and others. |
||
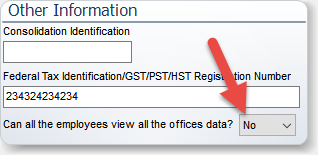
OFFICES ACCESS SECTION:
The offices listed here are the offices that the user will be able to access. This option is only in available if in the System Settings section for the Company the option "Can all the Employees view all of the Offices data" is set to NO. If it is set to YES no security is applied and all employees can see the data for of all of the offices. A note to that affect is posted on this screen advising you that users have full access to all data.
By selecting the drop down field you can get a view of all offices that can be selected. if you wish to provide access to all offices to an individual you can select the Add all Offices button.

REPORTS ACCESS SECTION:
The reports access tab allows for limiting the access rights of a user to various system reports. If no access rights is assigned to a user he/she will only have access to non-secured reports. To secure a report the report and user must both have the same Report Security Group assigned.
Report Groups are created in the System Setting - Report section. You can create as many groups as required. ( see Report Security Section in the reports section of this manual on how to activate report security).
When you edit a report in the Report Manager you can assigned the group(s) that have access to the report.

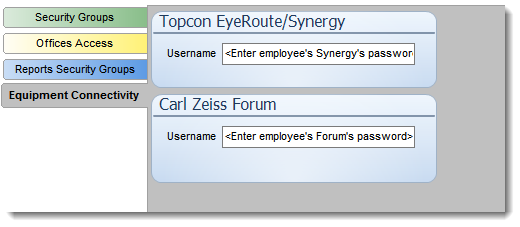
EQUIPMENT CONNECTIVITY SECTION:
The Equipment connectivity section allows administrator to enter the credential required to use certain equipment connectors.
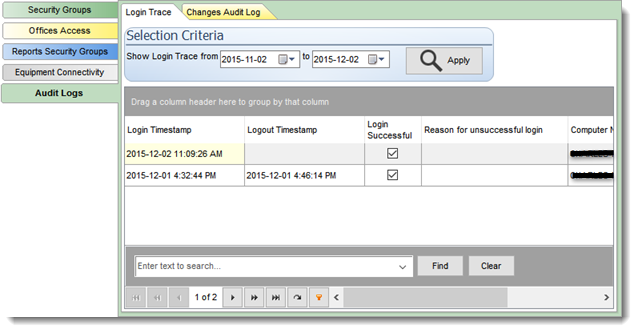
AUDIT LOG (requires security access)
The audit log tab is only available to users having security and audit access. It displays the logins and log out of the user as well as every change made to the system by the user. This feature is a legal requirement in certain jurisdictions. It's use is subject to privacy legislation in certain jurisdictions and should be restricted to security or audit personnel only. Review your applicable legislation for additional information.
The gird can be customized, sorted, filtered to display specific records. The first tab " Login Trace" displays all login attempts using the user credential. The second tab " Change Audit Log" displays all changes made by the user to the system.
Depending on your system and network configuration the log will register the Name of the Computer used to login as well as the Windows User name and IP address of the computer used amongst other items. The Change Audit will identify the date and time as well as the change made to a Filopto record by the user.