
Filopto offers several ways for a user to create an appointment. You can create an appointment via the Scheduler or via the Create Appointment button on the Front Office screen.
From the Create Appointment Button 
This option is a wizard style approach in that it guides you through the steps required to create an appointment it uses the Scheduler Find Next Free Time to select the appointment time .
1) The first step is to identify the Patient you wish to schedule. You are presented with a Patient search screen.
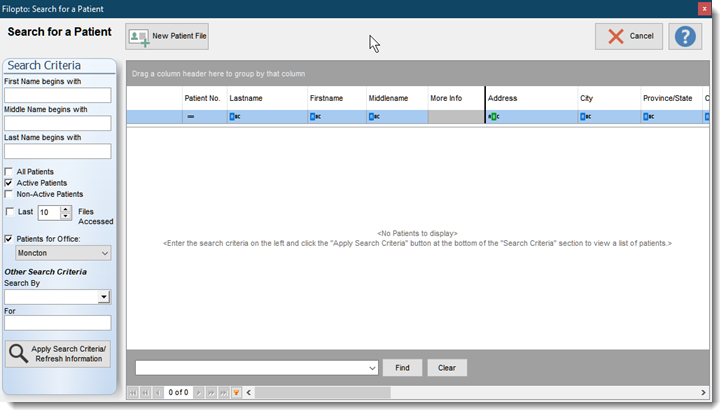
2) You can either create a new patient using the New Patient File button or search and locate and existing patient. Once a patient is selected Filopto will either:
a) Show the Multi-Appointment option, if the patient selected has family members identified in his/her patient file (patient household list). This screen permit users to either create an appointment for the selected patient or create multiple appointment at the same time for other family members.
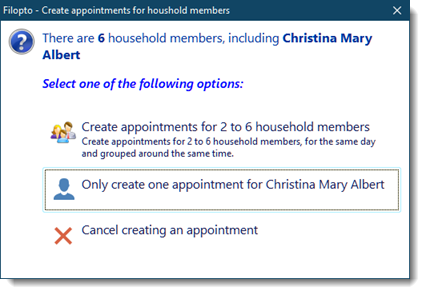
b) If the patient has no family members then the user is automatically shown the Find Available Time screen to locate an appointment time for the selected patient.
How to Use Family Member Appointment Wizard
The appointments algorithm will schedule all family members to be seen during approximately the same time period, if possible. For example if multiple providers are involved, Filopto will attempt to schedule all family members during the same time period for all providers involved. Family member A to be seen at 9am with doctor A while family member B, a patient of Doctor B, to be seen also at 9 am, by Doctor B. If all family members are patients of the same provider they will be scheduled sequentially.
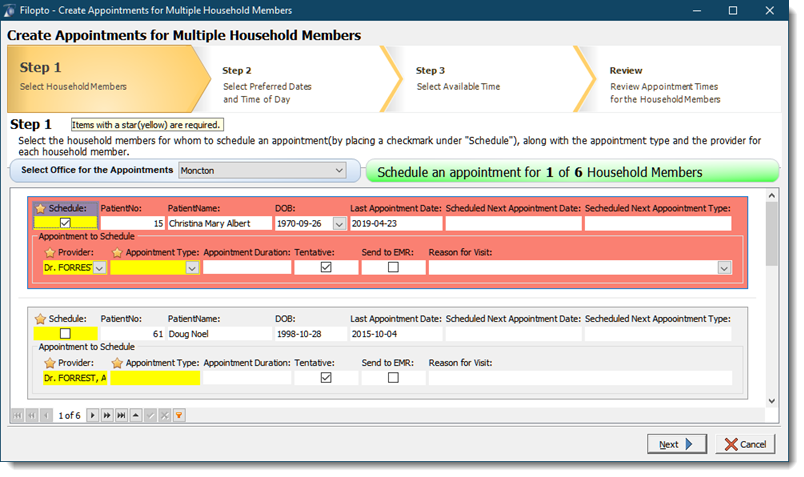
The Wizard is divided into several sections. The first screen displays the Steps associated with creating multiple appointments (1), Information on the selected office to use and on the family members selected (2) and a list of the family members with the selected member highlighted in red (3).

1) Select the Office that is to be used (2).
2) For each patient to be scheduled, complete the fields in yellow. Place a check mark in the scheduler field for each patient to be scheduled, select the provider and appointment type.
3) Once all the required fields (yellow) are completed click the next button .
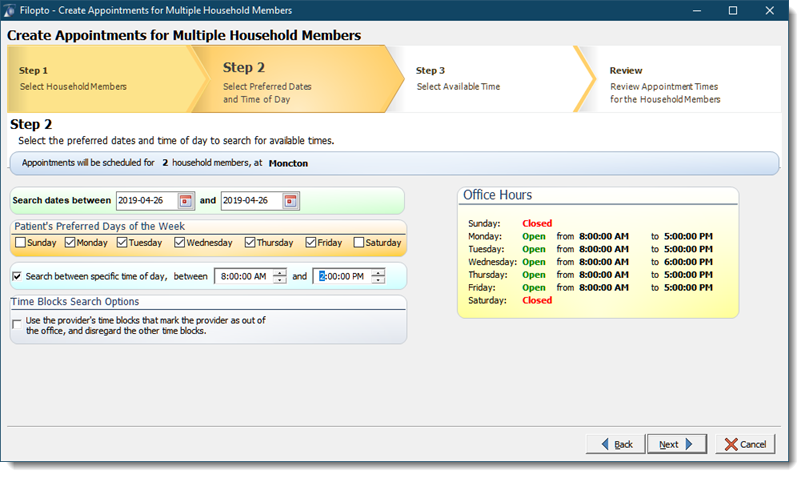
4) Select the preferred days of the week
Select the time of day to search , if none are specified (no check mark) Filopto will use the office open time period.
If you are using the Advanced Employee Manager providers time blocks, select the time block check mark or you may receive a message saying the doctor is not working for the day(s) selected.
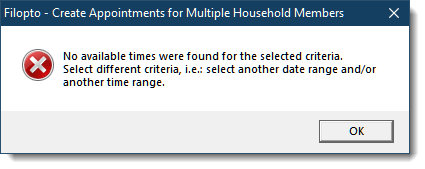
If no time slots are available for the defined search criteria an error message will be displayed giving the opportunity to the user to change the search criteria. The message will attempt to identify possible issues.
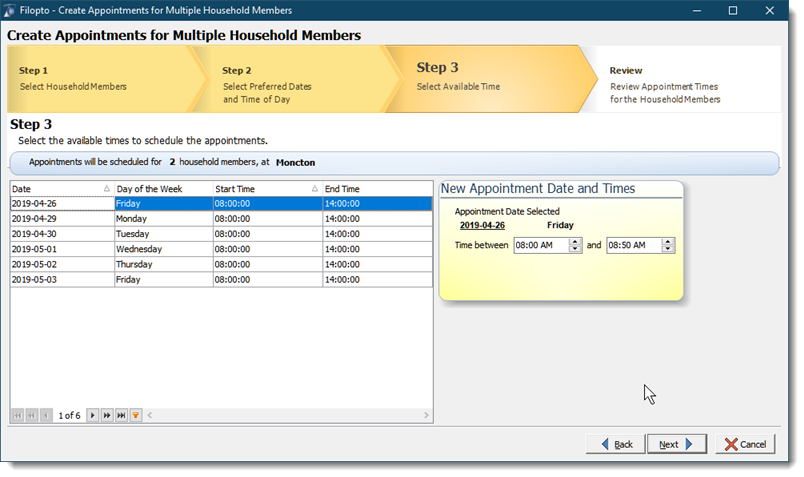
5) Select from the available time slot the appointment date you wish to use.
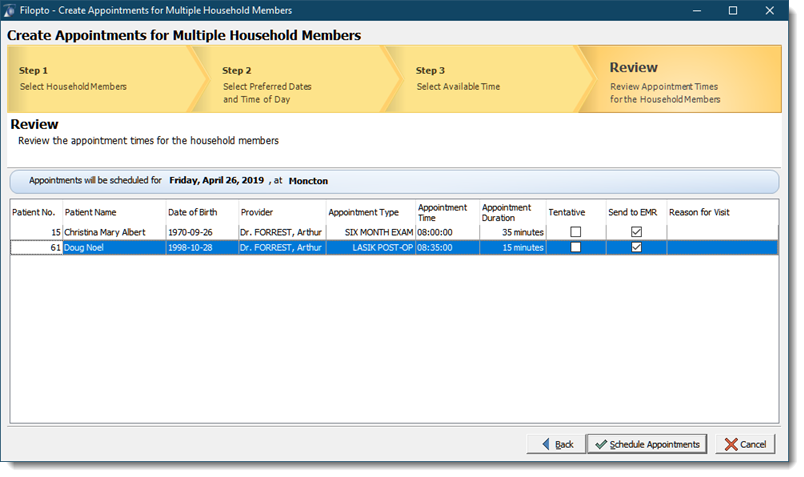
6) Review the selected time slot and press Schedule Appointments button to create the appointments.
How to Use - Find Available Time
1) Enter the appointment search parameters in section one(1) of the screen and click on the Search for Free-Time button.
2) Select the appointment time slot by highlighting it.
3) Select the Create a new appointment and close button to create the selected appointment.

Warning:
If you are using Filopto DE or EE edition with multiple offices, this feature will only work if you have the optional Advanced Employee Manager module. The results given (if you do not have the Advanced Employee Manager) is the system will not know in which office the provider is for a given time and date. The resulting appointment may be made in the wrong office.
If you are licensed for the Advanced Employee Manager make certain that you have created at least one time block identifying when the provider is working. If no time block is identified for the Provider the search result will be a blank list since the Provider is never available.
|
From the Scheduler Screen
To create a new appointment, you can either select the New Appointment Icon  , or double click on the time period in which you want to schedule the appointment or press the Insert button on your keyboard.
Automatically, the Patient Appointment Dialogue will be displayed. From this screen you can enter or select all pertinent information about the appointment.

The Appointment dialogue box is divided into various sections for ease of management of the appointment.
Patient Information
The patient information section will be automatically completed. As a patient is selected, these fields are automatically completed by the system
To select a patient from the existing patient files, several options are available:
1. |
Enter the patient file number in the Patient No and press |
 which looks like a button with a lookup glass. This selection button will display the information related to the patient file entered.
2. |
The Select Patient button will display a search selection list of all patients contained in the system. |
3. |
The New Patient button will display the Quick Entry screen for a new patient. |
Telephone Info
The Telephone tab displays the telephone numbers associated to the patient. You can verify with the patient the telephone numbers and make any adjustment required. The changes to the telephone numbers will be saved when you save the appointment.
Primary Insurance
Once a Patient is selected the information related to the patient is displayed. The insurance policy which has been set as the primary insurance policy is displayed in the Primary Insurance field for informational purposes.
The Authorization Number information is located in the drop down of the Primary Insurance policy. The drop down permits users to record any required authorization number from the insurance company onto the patients primary insurance policy record.

The Appointment Information Section

Appointment Check Boxes
Tentative Appointment / Needs Confirmation : Activates the Tentative Appointment icon and places the appointment in the Appointment Confirmation List. Some offices use this tool to call back patients to remind them of an upcoming appointment. Other offices use this field to get a report of all appointments which have not been confirmed. Once a patient has confirmed, the icon can be removed from the appointment record. This is not the same as the Show and No Show button available in the Scheduler.
Send to Exam: sends the appointment to the EMR Manager. (You can place a default check mark to any appointment(s) you wish to send automatically to exam in the "Appointment types and Recalls Setups" in the Scheduler section of the System Settings).
Patient's First Visit: Identifies the patient for marketing purposes. You can later send a welcome letter or other marketing package to the patient.
Place on Waiting List: When the appointment is saved, it also places the appointment on the waiting list in the scheduler.
Appointment Information
Provider: The Provider field identifies which doctor the patient is to see. This field is mandatory. If you attempt to schedule a patient to a doctor/provider which is not the doctor/provider on record in the patient file, a message will appear to advise you of this fact. You are given the opportunity to change the patient to another provider or ignore the message and continue with the appointment. The warning has no effect on the patient or appointment.
IMPORTANT: Double Booking
Filopto supports multiple appointments for a time slot. Users can change a Provider on the appointment dialogue which will result in the appointment being scheduled on the newly selected provider's Scheduler calendar. We do not recommend this if you do not want multiple appointments at the same time, since it may cause conflicts in the Scheduler for the destination provider. It is better to go review availability in the new provider's calendar prior to changing the appointment. |
Branch Office: The branch office for the appointment. (Note: Only Filopto Enterprise Edition (EE) supports this feature)
Appointment Type: The type of appointment to schedule. This is a mandatory field. The Appointment types are grouped by categories which can be expanded to show the appointment types by clicking on the + sign. The list is generated from the setup of appointment types made in the scheduler setting section in the system module. The automatic time settings for an appointment are set in the Scheduler settings (see time step).
Appointment Time
The appointment section of the dialogue is completed automatically based on the time period selected from the calendar and the type of appointment being made.
You can manually set the appointment start and end time by changing the values displayed in the dialogue. Note that the time can be incremented by the speed buttons located at the end of the time fields.
Appointment Room
Above the Patient's Reason for Visit section of the appointment dialogue, you have the ability to schedule the patient to a specific examination room. The user can select the Appointment Room available from the drop-down field.
Patient's Reason for Visit
You can use the Drop Down Pick List ( user customizable via System settings) or the Other field to enter the Reasons for Visit. The patient's reason for visit allows users to enter comments that the patient has made regarding the necessity for the appointment. This information is shown on the Scheduler, in the Exam list and Exam module. A user has unlimited space to record the patient's comments and reason for the visit. These notes are displayed in the patient summary section of the appointment and are available to the doctor in the EMR Manager at examination time.
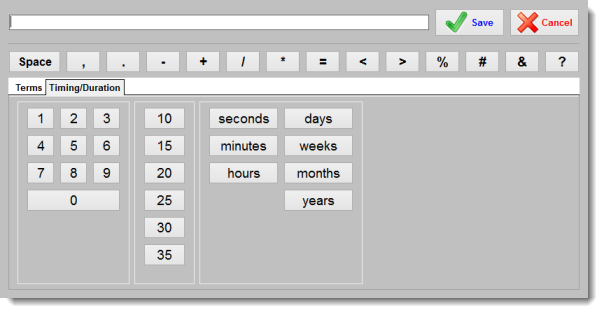
The drop down panel permits a user to quickly click on the term they wish to record.
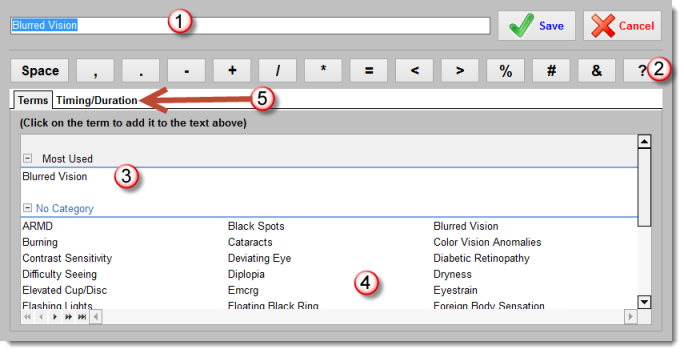
1) the data entry field which will contain the item(s) selected.
2) Special buttons which permits users to enter special keys in the entry field (1). For example if you enter a term and then want to enter a space before selecting the next term, you would select the space button to insert a space
3) a list of the last 12 most used terms used. the list is based on the last 90 days of data entry for the selected field.
4) a list of all the terms entered in the system settings for the selected field. ( user customizable)
5) secondary tab allowing users to enter a timing or duration element to the entered data. Special buttons to identify time elements are available for rapid entry.
The Other field for Reason of Visit contains the Spell Checker feature and will highlight misspelled words. ( For more information see the Check Speller section of the help file).
Special Instruction
The Special Instruction field which is automatically completed when an appointment type is selected. This field is to provide the patient with special instructions related to the type of appointment they are requesting (the Special Instructions are entered in the Scheduler settings section of System Module in the Appointment Type settings).
Appointment Note
The Appointment note is used to record some item that you wish to show on the scheduler. For example it could be that the Patient called and is going to be several minutes late to the appointment. By placing a check mark and entering the comment in the field the note is attached to the visual display in the scheduler using the icon  .
.

Appointment Recall Information
This section is related to recall notices and allows you to automatically schedule a Recall Notice for the patient and identify if it is to be mailed out based on the type of appointment. When selected, the time for the recall notice is automatically calculated based on the recall information entered for the appointment type in the System/Settings section. If this calculated date needs to be modified, a pop-up calendar is provided for quick selection of the appropriate date. The Recall Type drop-down field provides you with the ability to determine the type of recall you wish to schedule.

The Recall grid displays the last recalls sent to the patient. You can easily register if this appointment is resulting from one of your recall notices. This permits a user to determine the effectiveness of the recall program. By placing a check mark when the appointment is due to the recall notice, this provides statistics of the overall effectiveness of the recall program.
The Create Recall for Appointment button will automatically display the scheduler for the recall date selected, permitting the user to create an appointment for the patient for the selected recall date.
Referral Tab
Referral Info - Marketing Information
This tab contains administrative information that may assist in patient marketing. This section allows you to track the effectiveness of your various marketing programs.
The first item encountered is the "Referred by" field which allows you to track how patients are influenced into making an appointment. This field has a drop-down list associated with it which is fully customisable by the system administrator (see Database Maintenance). From this list you can select the appropriate reason for a patient's appointment and track the results in the system's report section. In this field, you can enter items such as - Appointment made due to Radio ad, newspaper ad - or - patient was referred by a colleague or other individual.
The Referred Type field allows the user to search the Filopto system to locate the address information of a referring person.
The Referral Notes permit the entry of any notes related to the referral. The patient Referral Letter Information button permits users to record specific information which is required for sending out a referral thank you letter. When the button is selected, the user is given the opportunity to identify the source and associate the mailing address for later generation of a thank you letter.
Referring Physician
The Referral tab provides an easy way to record the referral source for a patient. You can also add in the lower section the Referring Physician of the patient. The referring physician can be selected using the search button beside the Physician No. field. It will list all physicians contained in the Family/Referring Physician database.
By entering a Referring physician in this section the information including the NPI number will automatically be transferred to the patients invoice (if created using the pop up menu in the scheduler).
Note: That this information can also be entered at Invoice time using the Referring Physician tab on the Invoice Claim Screen.
Patient Recall Manager Tab
The patient recall Manager tab allows users to enter as many recalls as required. In some instances you may need to schedule several recalls for a Patient at a time. This tab permits users to add (+ button) or Delete ( - button) or Modify ( ^ button) recalls for the selected patient.
Office Instructions Tab
Management may want to remind users to advise patient on sales or changes of addresses or other items at appointment time. The Office Instructions tab displays a list of reminders entered by the system administrator in the System Settings.
Confirmation Note / Left Message Tab
This tab displays the appointment confirmation notes entered via the scheduler Confirmation List.
Saving an Appointment
Once you have entered all pertinent information required to create an appointment, you may save the appointment by selecting the SAVE and Close button. If you wish to cancel the data entry, select the CANCEL and CLOSE button. Note: If the appointment is already saved, the CANCEL button only cancels the new information and does not delete the actual appointment. To delete an appointment see Delete Appointment.
